Student Guide for Exam.net at NIST
General Information
Exam.net is available for all secondary teachers and secondary students. It is optional to use but must be used in important assessments where no reference materials are allowed.
- Exam.net is a platform that allows a teacher to host an assessment online (that can even be auto-scored) in a way that your students can access it while in your classroom or in other locations such as remote learning. When students start the assessment, their device can be locked from accessing other applications or other tabs.
- For remote assessments, Exam.net would be used in conjunction with Zoom webcams to keep an eye on students who might have wandering eyes to a second device.
- For in-class assessments, Exam.net would be used to ensure that students were only able to access the assessment and nothing else.
Get a NIST Account
- Teachers need accounts. Students do not need an account.
- Because your email is nist.ac.th, you will be given a paid account. Teachers can go to Exam.net and either:
- Login with Google, or
- Create an Exam.net account.

Settings for NIST
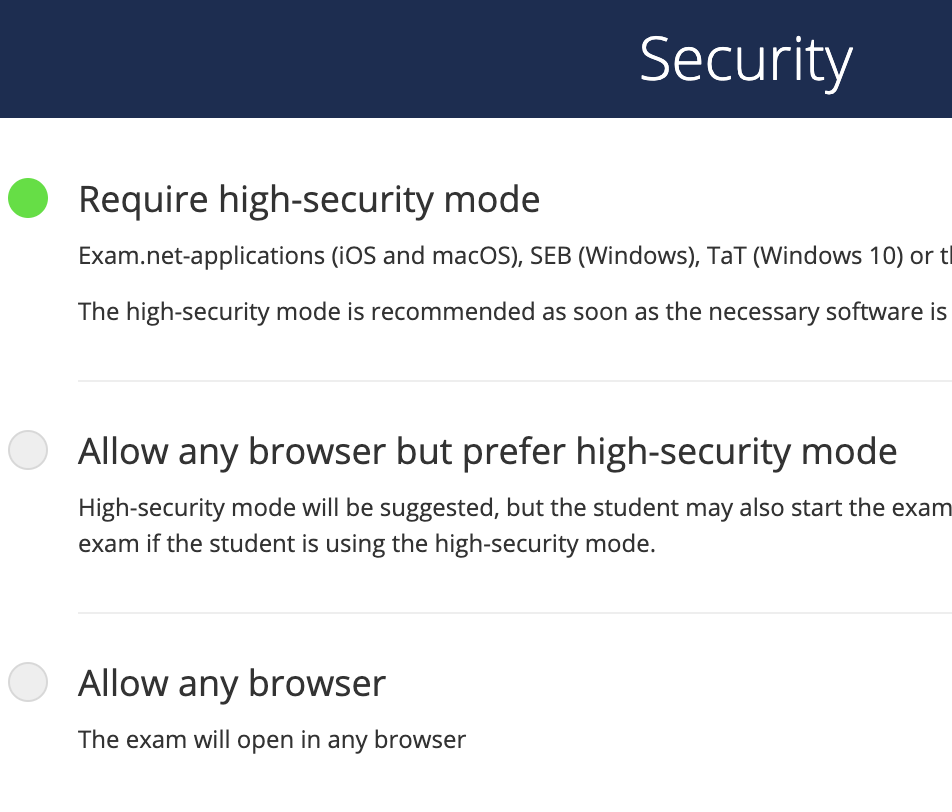
- Use high-security mode: The Exam.net app has been pushed to all student Macbooks (and teachers so you can test it out). This makes the app more secure than just using browser-based security. (although it is possible to have students work in a browser, it is not as secure)
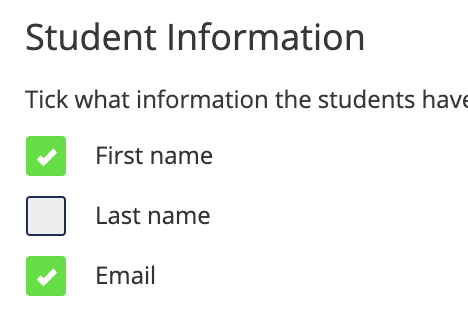
- Set each “exam” so that students enter only this limited personal information (not last name) to enter the assessment.
- To enhance security, students should not be muted to prevent using Alexa or Siri or a person to provide them with the responses.
Using Exam.net
Exam.net has some great explanations with videos for the following areas. Please learn about all the parts to ensure that your exam is actually secure (restricting student devices).
- Here is what the home screen looks like.
Create an Exam/Assessment
- View the first video Create an Exam (5:43) on the Create an Exam page. Please NOTE that this video shows how to make an exam that just gives students one big answer area rather than separate questions.
- You can use Auto-marked exam type even if you will grade the assessment by hand as it allows several questions.
- You can add reference materials (such as formula pages, etc.)
- You can allow students to scan written work or diagrams into the exam using a phone. If the teacher enables the Scan handwritten work with a mobile phone option on an exam, the student can scan handwritten work. It does not require any specific app, but the device needs to be able to read QR codes (built into the camera of most modern phones). This exam.net guide explains in more detail.
- You can allow spellcheck or not.
- You can allow a drawing area.
Open the Assessment and Monitor
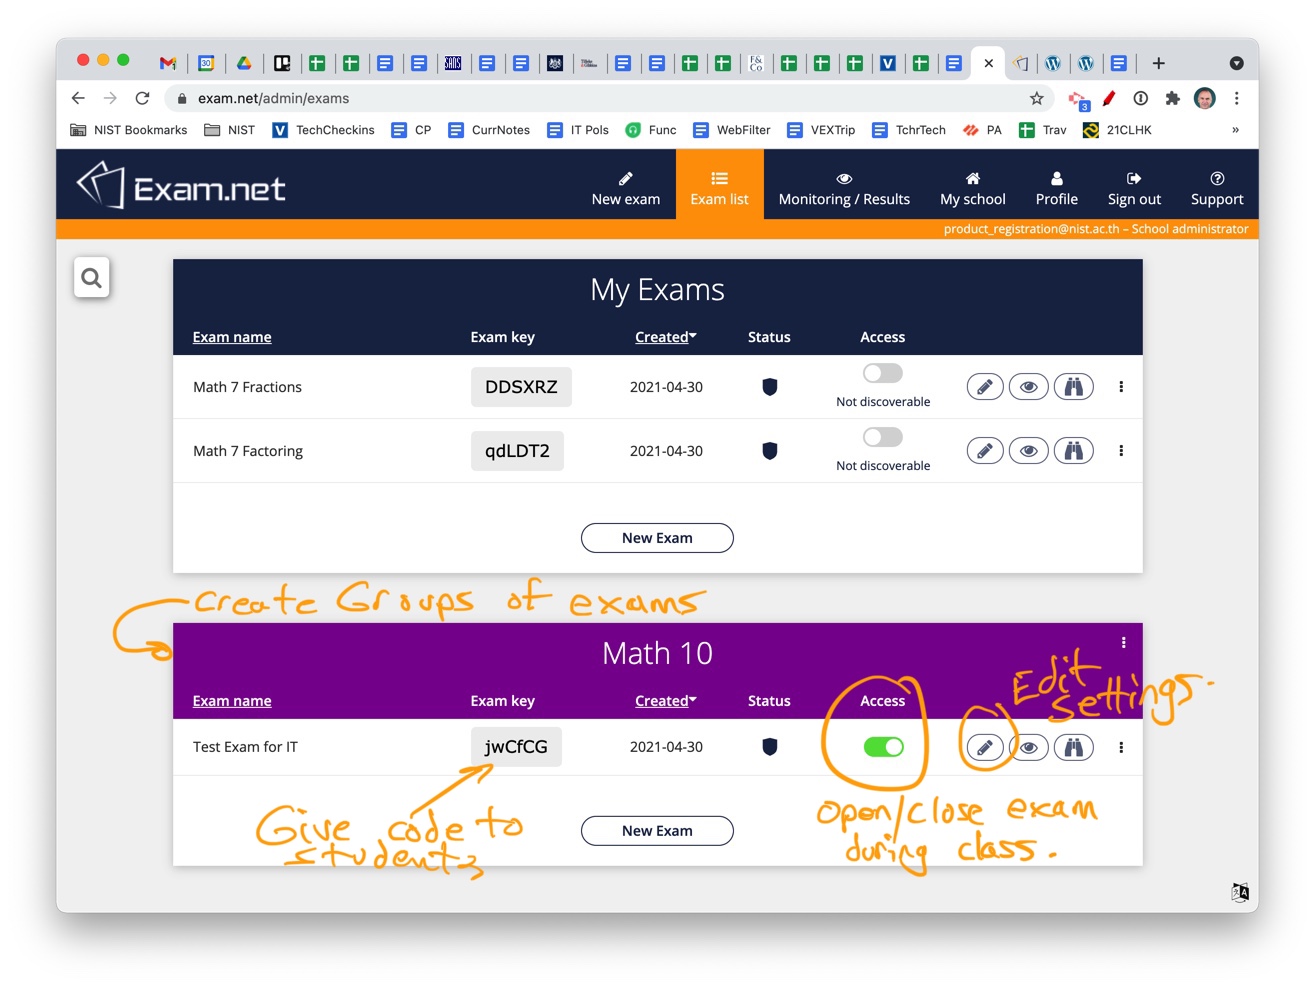
- Make the assessment Discoveralbe then copy the code.
- Deliver the code to your students in class when ready for them to start.
- Ask students to open the Exam.net application on their computer, not the Exam.net web site.
- Students will then enter the exam access code.
- They will be asked to enter First name and Email address to start the exam.
- You can then Open the exam once all students have appeared in the Review page for your exam.
- Monitor Webcams on Zoom: In remote learning, you need to use Exam.net with webcam monitoring when running an online assessment. Click here for a guide with a video that explains how to monitor in Remote Assessment situations. To enhance security, students should not be muted to prevent using Alexa or Siri or a person to provide them with the responses. Another Tip: ask students to show their phone then place it across the room.
- Here is a video that explains the full process of opening an assessment. Please NOTE that this video shows how to make an exam that just gives students one big answer area rather than separate questions.
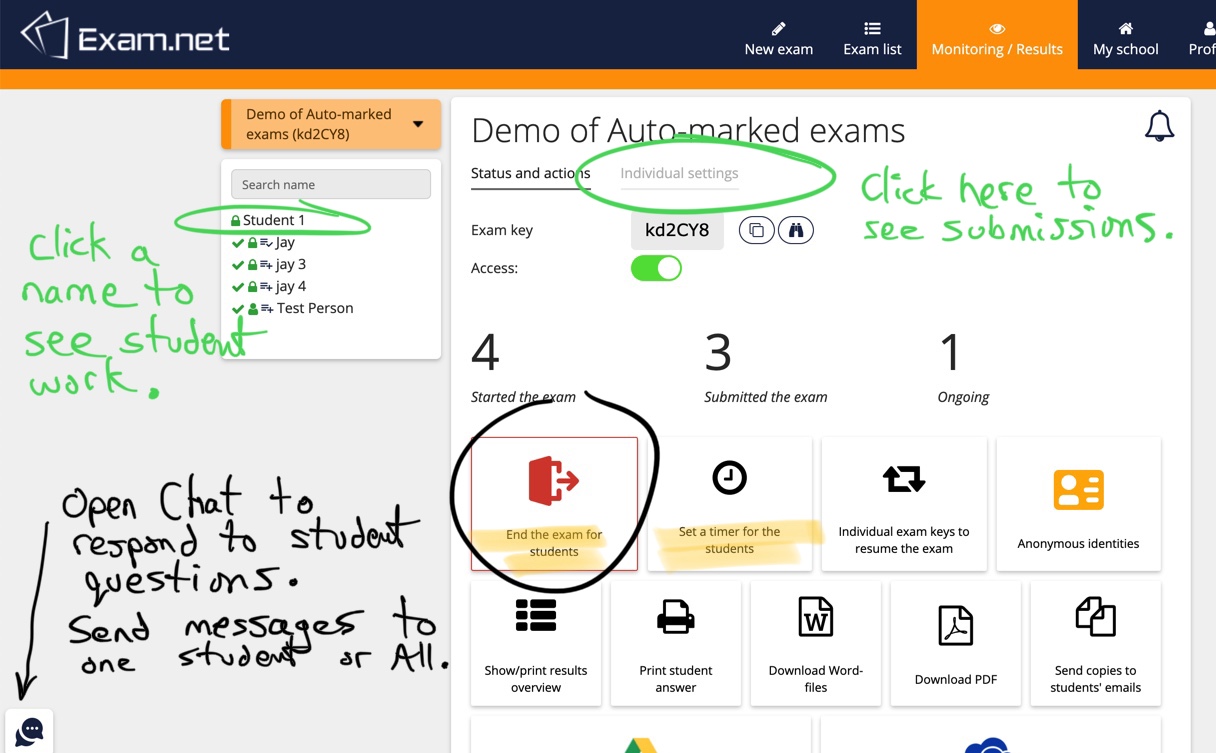
- Monitor Progress in Exam.net: You also need to monitor student progress on the Monitoring/ Results tab of Exam.net.
- You can set a timer.
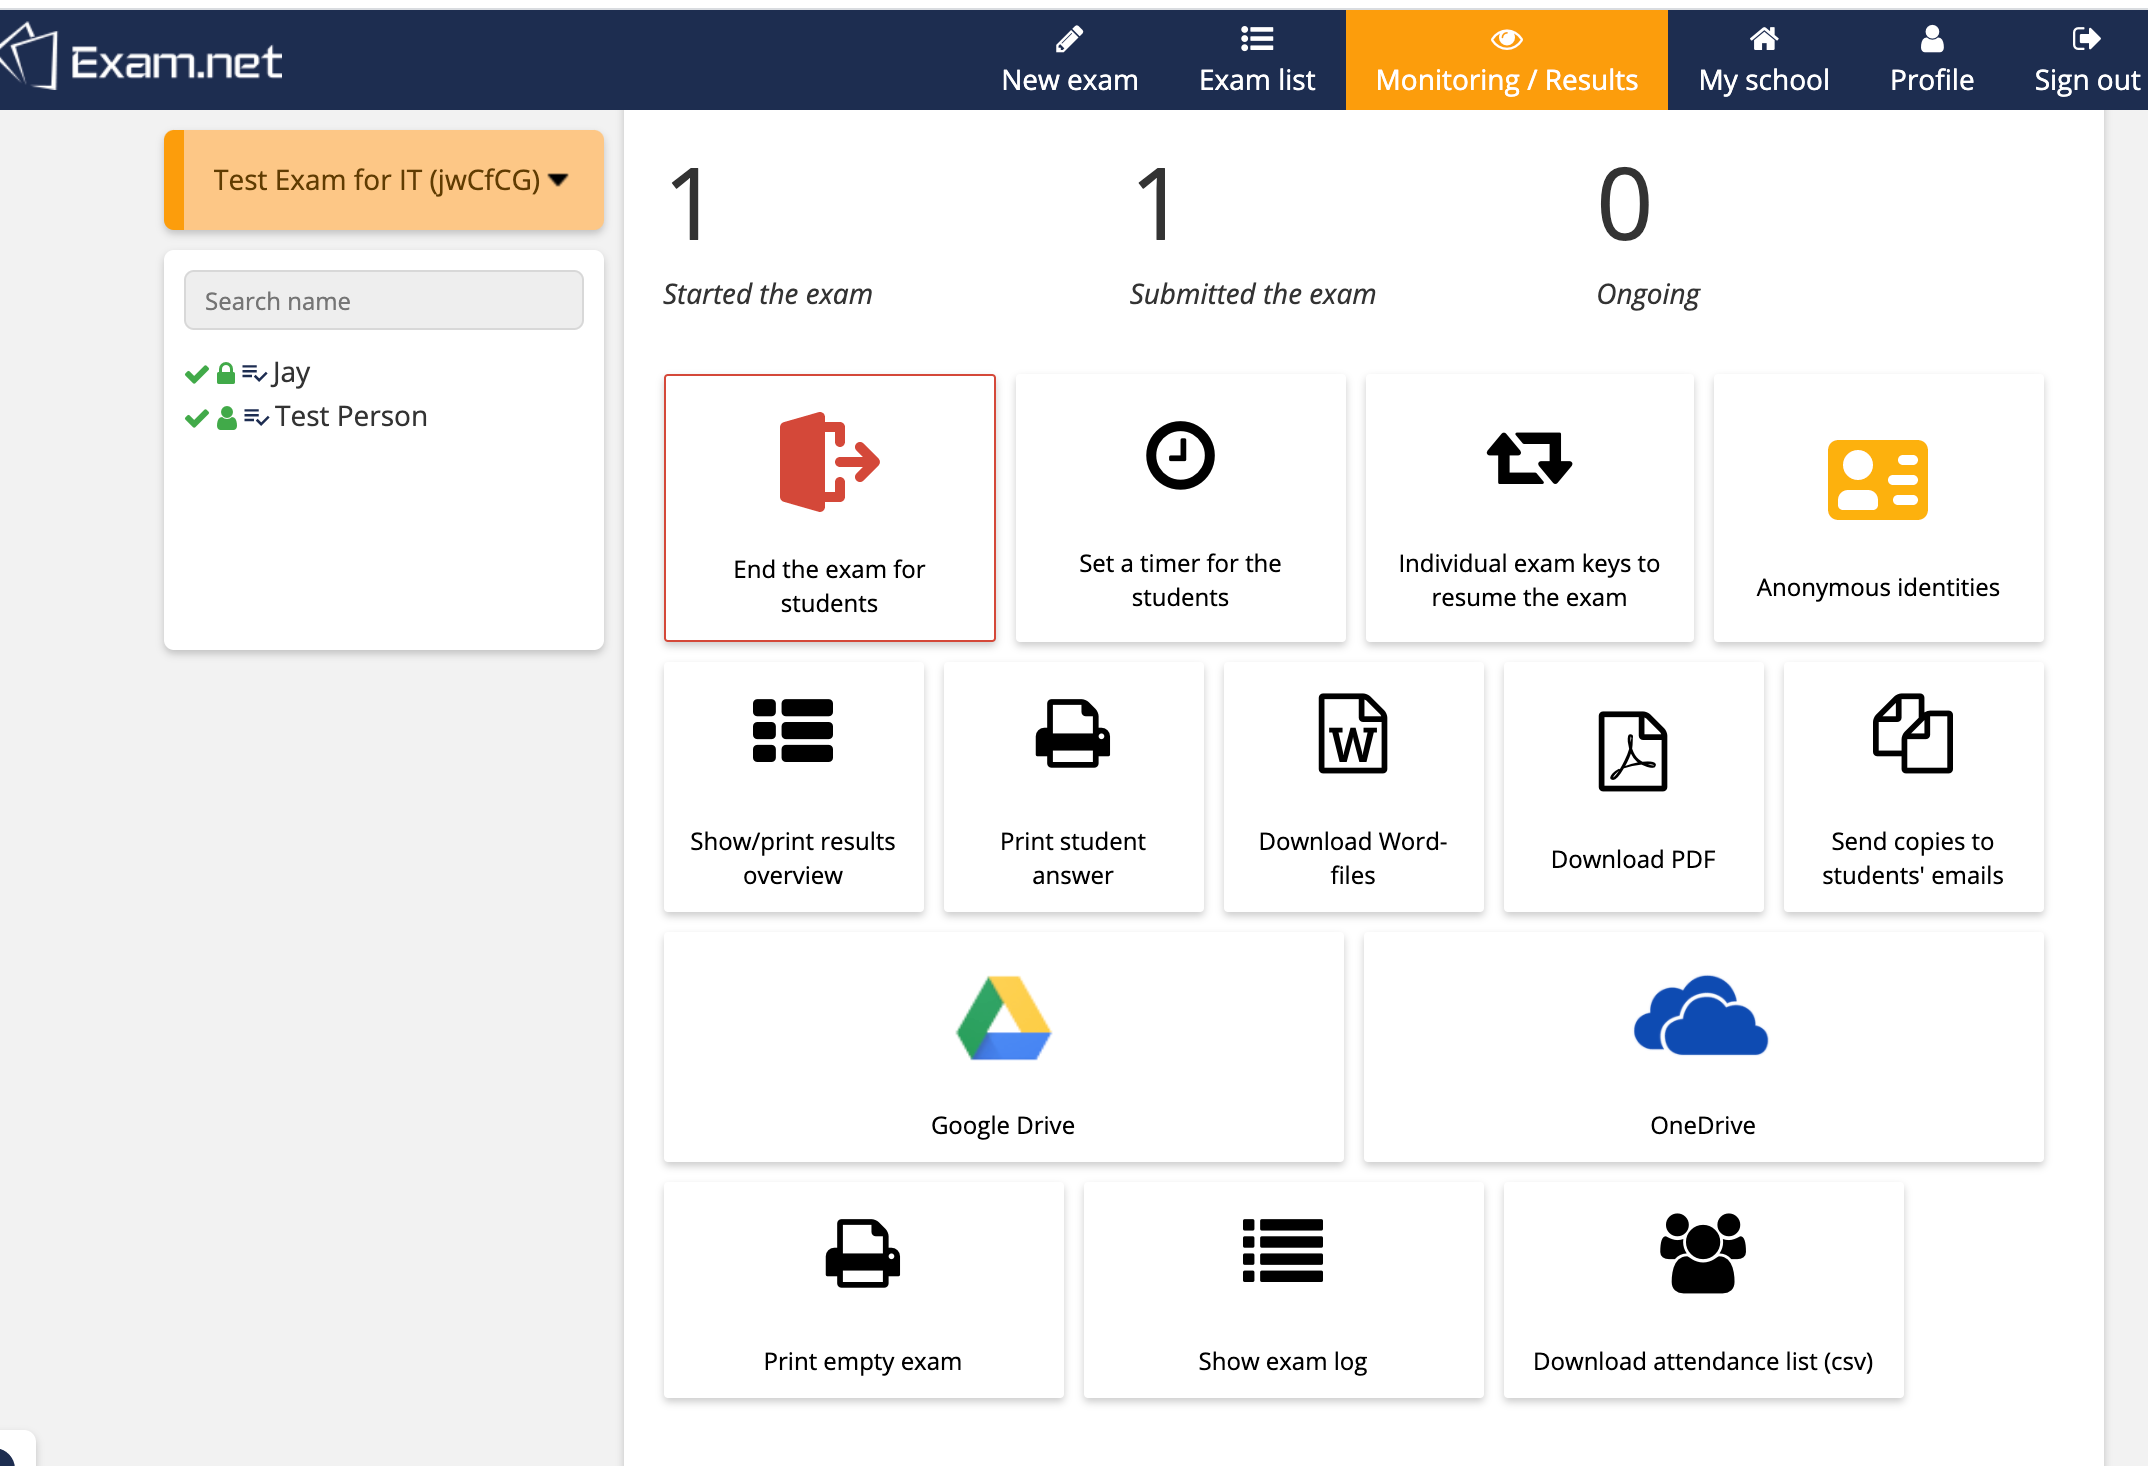
- Be sure to End the exam for students when completed.
- It is possible to give individual resume codes too.
After the Exam
- Be sure to End the exam when students finished.
- This slideshow is useful to guide students on how they use Exam.net.
How do I find the students’ work after the exam has ended?
After the exam, go to the Monitoring / Results view. There, you will see a list of students that took the exam. You have the options of seeing each of their submissions, either printing students’ work, downloading it as a PDF file or separate Word files, or exporting it directly to your Google Drive.
Where do I enter the score for each student assessment?
Exam.net is a platform for teachers to carry out examinations securely on the students’ devices. After the exam, the teacher chooses to either print, download or export the students’ work. Therefore, the scoring and student feedback are done within the Veracross grade book.
Delete or archive the exam
When you have finished working with an exam, you can choose to either delete it or put it in the archive. If you choose to archive it, you can still find it below the exam list when you click “Show archive”. You cannot move exams out of the archive, but you can duplicate an exam stored there and reuse the copy (with no student information).
A Few More Tips
- Students can type accents into Exam.net application, but they have to be very quick from tapping the preparation keys then the letter (e.g. option+e then e to get this é). If any delay, it will type it like ´e with the accent before the letter.
- This guide will help you know how to type accents on a Mac?https://www.freecodecamp.org/news/how-to-type-letters-with-accents-on-mac/
- Students with iPad Pencils CAN use their pencils for writing in Exam.net submissions. The teacher enables Drawing on the exam. The student can submit one or more drawings for each question of the exam. The teacher can view all drawings attached to each question.

- A teacher can provide a PDF document (resource material, formula sheet, etc.) that will be available in the locked exam session.
- Drawing tool and resource document show in the left of the student exam software.
