NIST uses Planet eSign to generate the digital signage content that appears on screens around the school. If you have access to modify this content, you can log in to the system with your NIST ID and password at av.nist.ac.th. This guide applies to the NIST Communications Master Screen format, which includes the following elements:
- Scrolling news ticker
- Video & photos loop
- Clock and calendar
- Twitter feed
- Weather feed
Each of these is managed differently based on the type of content.
General Guide
If you are managing digital signage content, it is highly recommended that you first watch all of the videos in the playlist below, provided by Planet eSign, as this will provide an overview of the dashboard and program structure.
Scrolling News Ticker
The news ticker requires manual entry and should generally be used for announcements, news updates and similar content.
Design
- Display Method: Ticker
- Speed: Medium
- Font: Arial
- Auto Size Text: Enable
Process
- Navigate to Message Pools –> Open –> NIST News.
- Click Add Message.
- Enter the text content (maximum of ~75 words).
- Select the start and end dates.
Embedded Video & Photos
Video and photo content can be difficult to manage due to the variations in dimensions, screen sizes and source formatting. This section of the master screen is generated through a content loop: Communications – Master Loop. It is highly recommended that any videos displayed on the screens be high resolution and include created subtitles (not autogenerated subtitles from YouTube for the reason described below). If no subtitles are available, refer to the guide below.
Process (Photos)
- In Planet eStream, select Create –> PhotoSet.
- Enter the Title and Description.
- Upload the photos
- It is highly recommended that you first rename all photos to be descriptive and numbered (e.g., Party in the Park ##) for the reasons below.
- In Planet eSign, navigate to Content Loops –> Open –> Communications – Master Loop.
- Select Add Content –> Photo Albums –> [Album Title].
- Under Content Options, enter a Duration of 8-10 seconds (representing how long each photo will be shown).
- Set the maximum number of items to the number of photos.
- If you have not entered a descriptive title for the photos, you should set Captions to none, as the titles will be meaningless in that case. If the photos are labeled, this can be set to Title.
- Under Scheduling Options, enter a start and end date if desired. Set the Duration to the number of photos times the Duration that each photo is displayed. (For example, if there are 25 photos displayed for 10 seconds each, enter 4 minutes and 10 seconds.)
Process (Videos)
Note: It is highly recommended that you clearly label all files to make them easily identifiable and easy to locate.
- If you already have a video and subtitles in SRT format, upload the video file via Create –> Upload in Planet eStream. If desired, add a description. Otherwise, click Confirm. You then have the option of adding additional files or Start Upload. (It will take a few minutes to process.)
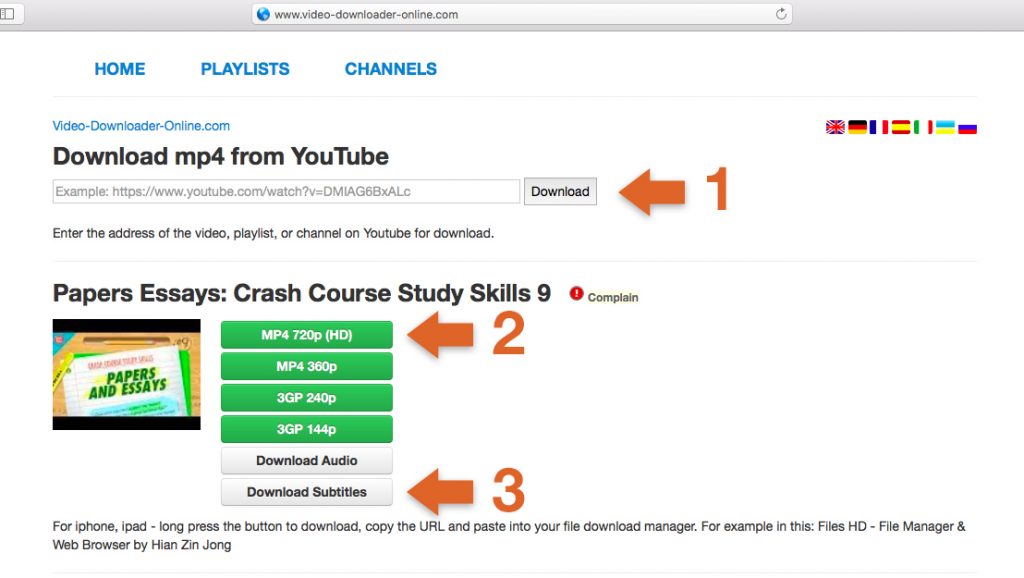
- If you want to add a YouTube video, follow these steps:
- Copy the URL of the YouTube video
- Navigate to video-downloader-online.com
- Paste the URL of the YouTube video and click Download
- Choose the highest available resolution (preferably 720p)
- Then click Download Subtitles and choose the SRT format.
- Upload the video file via Create –> Upload in Planet eStream. If desired, add a description. Otherwise, click Confirm. You then have the option of adding additional files or Start Upload. (It will take a few minutes to process.)
- To add subtitles to the video, click into the uploaded file on Planet eStream and, under the Details tab, choose More –> Manage Subtitles –> Upload Subtitles (.srt).
- Navigate to the content loop that will include the video and choose Video and Playlist Content.
- Choose the uploaded video under Content Options and check Enable for both Play Audio and Show Subtitles.
- Under Scheduling Options, check the box for Match duration of content.

Though it is not recommended due to high bandwidth use, it is also possible to stream videos from YouTube through the following steps:
- In Planet eSign, navigate to Content Loops –> Open –> Communications – Master Loop.
- Select Add Content –> Custom HTML
- Under Content Options, click Edit Custom HTML –> Source and use the following responsive code as a base, replacing YOUTUBEEMBEDCODE with the embed code from the YouTube video:
- <style type=”text/css”>.embed-container { position: relative; padding-bottom: 56.25%; height: 0; overflow: hidden; max-width: 100%; } .embed-container iframe, .embed-container object, .embed-container embed { position: absolute; top: 0; left: 0; width: 100%; height: 100%; }</style><div class=”embed-container”><iframe allowfullscreen=”” frameborder=”0″ src=”YOUTUBEEMBEDOCODE?cc_load_policy=1&autoplay=1&rel=0″></iframe></div>
- In the code above, the cc_load_policy=1 portion forces the video to display captions. This will not work with YouTube’s autogenerated captions.
- The autoplay=1 portion sets the video to play automatically. It will otherwise not play on the screen.
- The rel=0 portion prevents YouTube from showing related/suggested videos.
- Under Scheduling Options, set the Duration to the same length of the video, or one to two seconds shorter. This will ensure that once the video is complete, the content loop will shift to the next video or photo set.
Clock & Calendar
The clock is generated simply by adding the Clock panel and setting it to display h:mm. The calendar is a Google feed pulled from the Veracross public events calendar, with the following settings.
Design
- Source: All School Events (Public) [Google Calendar]
- Calendar Mode: Today Only
- Font: Roboto
- Font Size: 18
Twitter Feed
The Twitter feed pulls content directly from the @nistschool account, meaning content must be tweeted or retweeted through the account in order to be displayed. However, due to Twitter’s API coding, not all retweeted content will be correctly displayed. This is unavoidable as of 2018.
Design
- Data Options: Images Only
- Twitter Handle or Hashtag: @nistschool
- Maximum Number of Items: 30
- Font: Roboto
- Interval: Slower
Process
- In order to control content through the Twitter feed, you must have administrative access to the NIST Twitter account. Alternatively, you may follow this same process for a different account.
Weather Feed
The weather feed is generated through weatherwidget.io using the following settings on that site. (Settings that are not listed should be left as the default.)
Design
- Settings –> Select Location: Bangkok, Thailand
- Options –> Font: Roboto
- Options –> Icon Set: Climaicons Animated
- Customize –> Background: 6f8f3a
- Customize –> Cloud Fill: ffffff
Process
- After entering the settings, select GET CODE and copy the code.
- Go to embedresponsively.com and select Generic iFrame.
- Paste the code into the box and select Embed.
- Copy the new responsive code.
- In the Screen Designer on Planet eSign, select Custom HTML –> Source and paste the code. Don’t forget to press Save!
Do you have additional questions? Contact the Communications Department for training or assistance.